Tuesday 1 November 2011

More mockups

Time to get busy with more of the myriad of jobs to do.
Next up was the location of the fire extinguisher and electrical kill switch. In both cases, I much prefer electronic solutions. I just think that building an expensive car and then fitting cheap choke cables to operate equally cheap master switches or extinguishers is wrong. Electronic master switch and extinguishers may be a bit more expensive but the result is a much neater installation.
Anyway, a couple of plain holes are the only bits I'll need to do at this stage ahead of paint.


Another couple of holes are needed in the trunk lid for the locking / bonnet pins. Then there were a couple of brackets to make to hold the pins themselves.


Moving on and with a head of steam from those easier jobs I got stuck in to making brackets to hold the rear tonneau / deck lid together where it had been  cut in half to fit around the roll cage.


The idea was to make up some nut plates to go inside the box sections and then hold it all together with aluminium U sections underneath. This was a job my Dad had done on the '60 Corvette so I was working a little in the dark. I had thought about using Riv-nuts but they are not flush to the surface. I seemed to recall something called a clinch nut which Dad had used. A search on the net and an order from eBay had a packet in my hands. To use these, you have to drill an 8.6mm hole and then press them in place with the vice. It turned out to be ever so easy to use and the nut plates were done in no time.

http://www.npfasteners.com/ns.shtml


A few more holes drilled in the U-section and the fiberglass and it all came together.


Wednesday 5 October 2011

Mockups and c0#! ups...

So, the time has come to tell you what has been going on with the Vette and especially the roll cage.

As you will know from my earlier posts, my concern all along has been space in the cockpit. To that end I selected the smallest seat I could fit into and then locating it as far back as possible for maximum leg room.

So you can perhaps imagine my distress when the day after I got the car back (a big day of trailers and borrowed vans) I discover that the seat will nolonger fit into the mountings I had drilled but instead was held around 2 inches further forward by the main cage hoop.
Despite asking the cage guy to let me know if he had any trouble, he had decided that the best and only way to run the cage was to compromise the seat location.


Looking at what he had done, I'm sure it made for the best cage but he should have talked it through as a compromise might have got me a good cage and most if not all of the leg room I need. As it is, I'm now left with my knees tight under the wheel when I shift to the brake or clutch...


So some difficult conversations between myself and the cage man followed. He didn't like the idea of having to remake almost all the cage so in the end we compromised. He has bought me a leather replica steering wheel that's 2 inches smaller than standard and I'll have to live with whatever legroom I'm left with. I may end up having to bend or modify pedals too but I'll not know until it is all back together.

With that drama behind me it is time to get on with mock-up. I hate to drill holes and make modifications to a freshly painted body. As far as I'm concerned, you should only be bolting things together once the car has been painted. So I've now got to make all the body modifications and trial fit hardware etc  before the body comes off to go to be painted.
First job I have tackled was to fit the extra lights that illuminate the racing numbers. Easy to fit and shiny they boosted my moral after the stress about the cage. So I went to my photographs to decide what and where to put these. As with most cars of the period I think they used Lucas lights and I could get replicas online very easily. The amazing thing I found doing this was that the restored original car was missing the rear number light and that the rear number had been put on in the wrong place! Considering it sold at auction for almost half a million dollars you would have thought they would get that sort of thing right?

The original car on the grid at Le Mans with number light

The restored car without number light!

So out with the DeWalt drill and away we went with holes for mounting studs and screws as well as wiring grommets. Not a big job but they made me feel like we were back on track making forward progress rather than taking two steps back for every one forward.


Light should line up with Number on Boot Trunk!

and this should light the number on the door

More mockup and less of the other thing next time :-)

Wednesday 7 September 2011

More Motor Stuff

So, having decided that the motor was coming apart I started to think about what I should do to improve it a little (MORE POWER!!!) as it was going to be in bits anyway...

If I was at work I'd call this project creep and get all upset but as this is my thing then I get to bend the rules and decide that instead of sticking to a fairly basic spec I'll look at pushing the boat out a little on the motor rebuild ;-)

To figure out what to do, I looked on a lot of web sites and re-read the FIA Appendix K to ensure I knew what I was allowed to do. The main limiting factor for historic racing of an American V8 is that you have to keep with the original pressed steel rocker design and can't fit roller rockers etc.

The upshot of that is that engine rpm has to be fairly safe and so wild cams are not going to work.

I find a useful programme on the Comp Cams web site called CamQuest LINK 2 CamQuest.

With the help of this and a couple of books and catalogues I pulled together a spec of 327 motor that should give very good power at 6,000rpm and not need to go much higher before I change gear.

I could have ordered the parts from the US on import but instead I decided it would be just the same after shipping and tax to buy them from Real Steel in the UK.  

And here are at least some of those parts are on the shelf ready for the rebuild :-)


I wasn't (too) idle whilst waiting for these parts and stripped out the pistons and cleaned up the block ready for a repaint.


But now it was time to go and collect the car from the Cage Manufacturer which will be the subject of my next blog...


Thursday 18 August 2011

Catch up #1 Big Holes !

So, a bit of a delay since the last posting. But I'll try to get caught up now.

With the seats fitted, the car was ready to go for the cage fitting but I then had a bit of a delay. The first company who agreed to do the cage came up with a massive estimate for the cost and a very long delay until they could start. The second company came up with a better quote but kept putting off the start date (I was waiting on a week's notice for about 2 months with them) so I went to a third company. In the end it was the 11th of July before work started a good 6-8 weeks behind plan.

So, with work on the car itself a little stalled, attention turned to the motor.

It was reported to me that the motor had been stripped and checked over by the previous owner during the restoration work but as I'm going to be flat-out around the track, I needed to check it over for myself.

First the intake and rocker covers came off and the very good news was that the casting numbers for the heads suggested it should have big valves and with the covers off I could see that the heads also had pushrod guide plates fitted already.


Once the heads came off, I got a look at the bores...

For anyone brought up on small capacity European motors, the sight of a 4 inch bore is a bit of a stunner, these are some huge holes!


A closer look showed more good news. The block has been bored out to +0.060 and the cylinders bores look to be in very good condition. Also, the pistons are high compression types which with the nominal head volume should give at least a 10:1 compression ratio.

And things just kept getting better with the inlet vales turning out to be the slightly bigger 2.08" rather than 1.98" diameter (like a small saucer on a stick!).


That unfortunately was the end of the good news. Despite plenty of oil in the bores and my biggest extension bar, the engine could not be made to rotate.
After a little delay I decided to crack off the main bearing caps, then with a little 'tap' the crank un-froze from the bearings and spun. Taking the main caps off completely showed an amount of pitting on the crank and a bit of scratching of the bearings. I think that having been left so long, the crank had started to corrode to the bearings, possibly due to moisture getting in. Long story short, the crank was going to need treatment. But if I was going to take the engine so completely apart, shouldn't I look to uprate it just a little bit?

More on plans for the minor warm up of this power unit in future blogs!

Monday 9 May 2011

The Saga of the Seats Part 2

Other things have been taking a lot of my time for the last month (holidays and illnesses plus the dreaded "real work"!)

So, to bring things up to date;

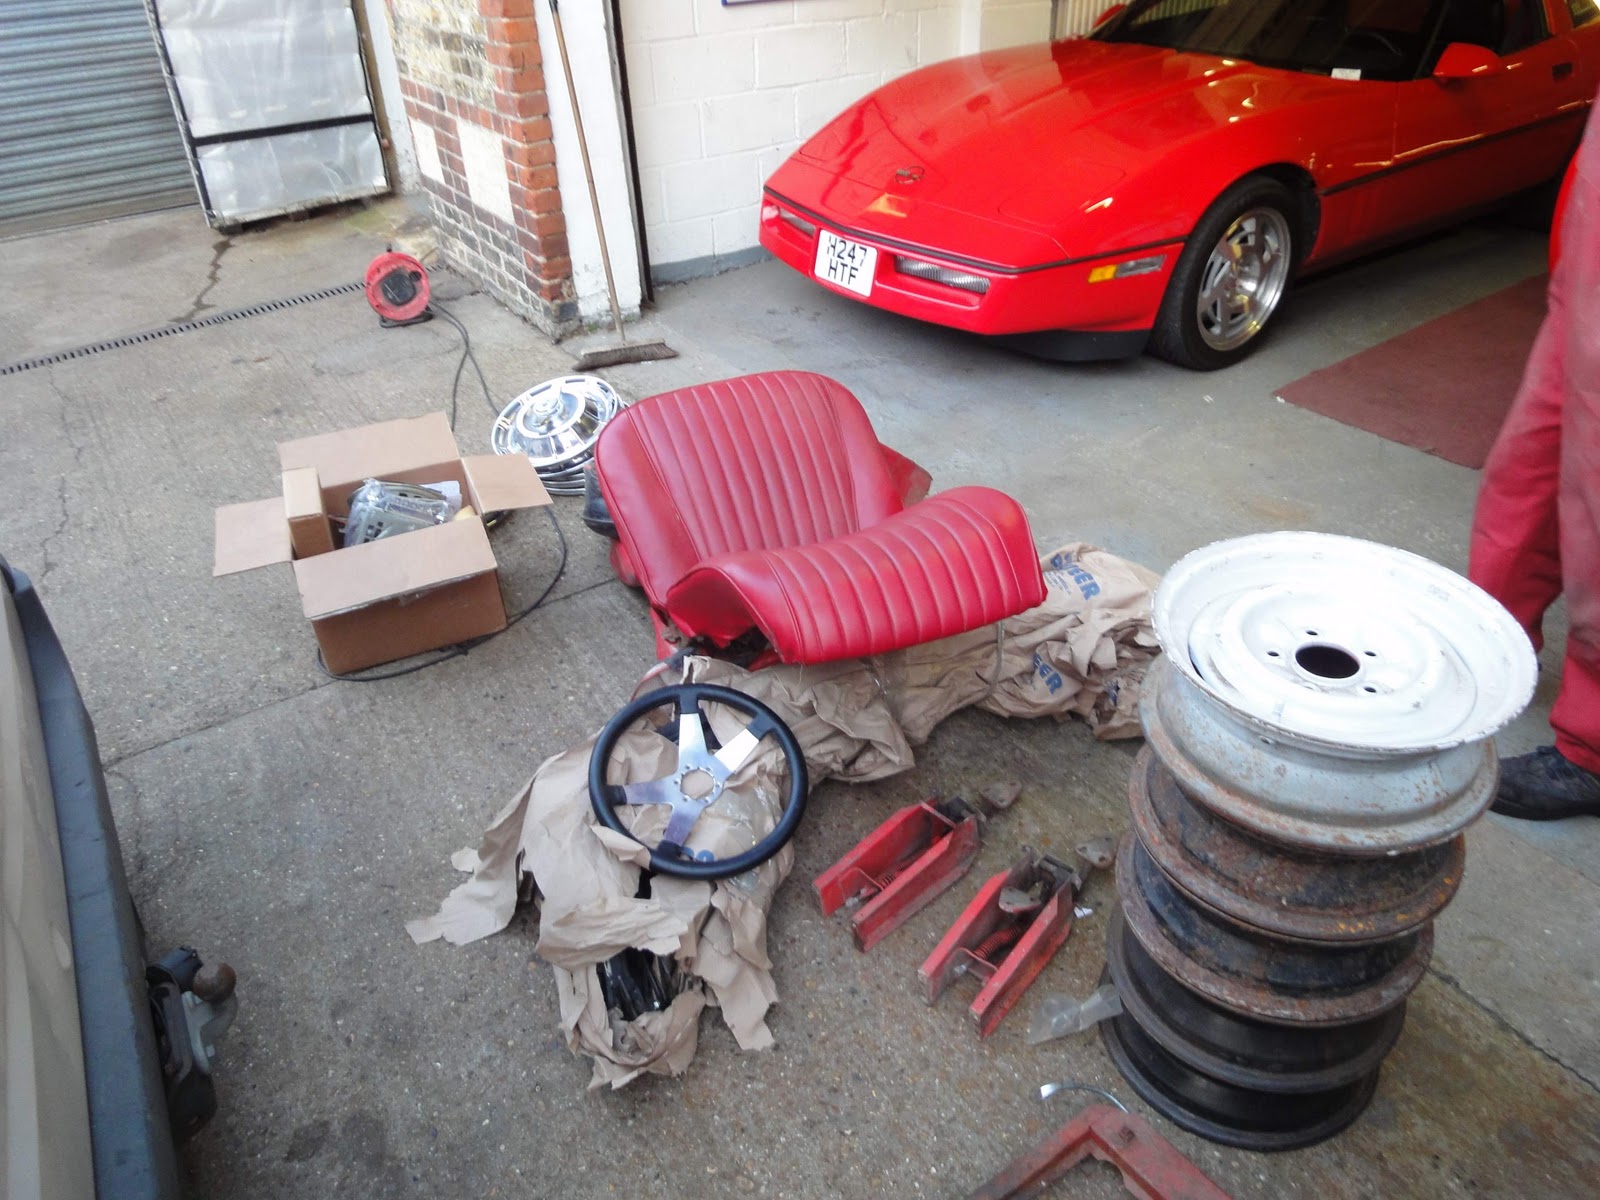
The seats have arrived from Cobra and they look great. I'm really pleased with the textured vinyl and the colour as well as the custom embrodery. All in all I was a very happy boy (even if I nearly turned purple getting the box into the back of the car to take it to the workshop!).


So, the next step was to get them in the car.

I bought 4 M8 threaded studs online and then ground one end sharp using the bench grinder. With these screwed into the base mounting holes of the seats, I put them into the car and carefully scribbed some guide lines from side to side and then from front to back in the position I wanted the seats (basically as far back as possible due to my 6'2" frame). Then, taking these marks as reference plus the actual measured spacing of the mountings measured off the seats, I marked out my 4 location hole centres. I quick buzz with the drill and the spiked studs were then able to guide the seats into place.

At the moment the holes are only through the floor of the body and further reinforcement will be needed, but this will do for now to allow the makers of the roll cage to see where the seats go and make sure the cage doesn't interfere and that the harness pick-up on the rear tube is also at the right height.


So all was going very well until I had a couple of bits of luck (not sure if good or bad luck just yet).

First, I came back to the workshop to find that a huge chunk of ceiling plaster had fallen on the Corvette (!). It had come down on the seat and screen area but the combination of the car cover and the plastic bag on the seat itself meant the seat survived unscathed. The car cover wasn't quite so lucky and now has a 6" tear in it which I'm planning to fix with some tent repair products.


The second thing was that my other classic got in the way both physically and figuratively.

My other classic is a '56 Studebaker Golden Hawk also needing restoration. It was going to be a little more on the back burner while the Corvette was got underway. The only trouble is that it sits between the Corvette and the exit from the workshop and despite having run (briefly) on arrival from Florida, now that I needed to be able to back it out it refused to go...

Long story short, I figured out that the fuel pump was to blame, probably not helped by the draining of all fuel from the tank and hence a load of c#4p getting sucked into it.


I have no idea why I'm smiling as the offending pump in my hand had taken a good few hours of my time to identify as the guilty culprit (thanks to Connie for turning the key whilst I had my head under the bonnet to figure things out!).

So after a little bit of thought I decided that rather than try and get a refurb kit for the pump (and helicoil a damaged mounting screw hole) I would be much better off to fit an electric pump.

A few auctions on ebay later and I had all the parts I needed and a quick installation on the Studebaker was rewarded by the sound of a V8 getting a plentiful supply of petrol!


So we are back to where I thought I was about a month ago ready to call up the Cage manufacturers and get a date to drop the Corvette off; though I still have to fix the winch on the trailer.... Still, can't feel down in the mouth as I just have to click on the movie to hear that v8 sound :-)


Sunday 20 March 2011

Do you remember Multi-Coloured Swap Shop?

So, my question is do you remember Noel Edmunds and Swap Shop at the Weekend ? Because I just feel like I have been doing the Automotive equivalent!

When I built my first Corvette I started by contacting the recognised UK expert on all things Corvette, Tom Falconer at Clairmont Corvette. He actually gave me the lead that found that first Corvette and encouraged my restoration / conversion and even in the run up to the 2005 Goodwood Revival allowed me to queue jump him to grab the last C1 Corvette windscreen in the country to replace one I cracked in testing.

So, I had kept in touch with Tom and regularly looked at his web site http://www.corvette.co.uk/ . And it was whilst looking on there that I spotted a set of 5.5inch wide steel wheels. 

These may not sound very exciting in a world full of 8-10" alloy wheels on every road car driving around today, but for this project they are very important. The standard Corvette wheel was only 5" wide and the 5.5" was a very rare option that is nearly impossible to find (and not being reproduced). So Tom's set of 5 wheels and tyres were just what I needed.

A quick phone call to Tom secured them with my name on them but also put in place a cunning plan. You see between the first Corvette and now this one, I was beginning to build up a substantial collection of unused, spare and duplicate parts. All of which, Tom expressed interest in taking off my hands in the form of a swap (at last you see the link to Noel and Saturday morning kids TV!).

So, I grabbed up a van load of items of no use to me and headed south to Snodlands to see Tom, pick up my wheels and see what he made of my bits.


 So, as you can perhaps see, I had a couple of seats, a pile of (standard) wheels, I refurbished 1962 radio, a servicable soft-top and (not in the pictures) a 2x4bbl intake manifold and carbs (that when sent from the USA had been cracked and that I had re-welded).

What I came away with was this very nice set of precious wheels (and new tyres);


plus a bundle of cash as Tom was convinced he could sell on my items for more than he was asking for his wheels!!

So it was smiles all around and I was humming a happy song the whole (300miles) home!

Tuesday 15 March 2011

The Saga of the Seats Part 1

So as I said in my previous entry, the next step in the build is going to be to select and get a set of FIA racing seats to fit into the rather cramped cockpit of the Corvette.

I had my head in all of the catalogues for a few days and came to the conclusion that the perfect seat was going to be the Racer Pro by COBRA Seats. They seemed to be the most compact seats available in terms of external dimensions and were even relatively well priced.


But a little warning voice in the back of my mind said I should see them for myself first....

It was a lucky thing I did because once I (tried) to sit in them I found out that not only (to coin a phrase) did my bum look big in this, but it wouldn't fit in no matter how hard I wriggled and pushed, my hip bones were hard against the seat shell and neither were going any where! I promise you, my consumption of Christmas Turkey and New Year Curry had no impact on this, it is entirely a skeletal issue!

So, it was over to plan B and a re-check of the dimensions inside the Corvette Cockpit. The big problem seems to be the width across the 'wings' of the seat at shoulder height so I went back to the car and the catalogues to see what else could fit. The result was that I needed to go and try another COBRA seat, this time the Monaco Pro which as a bonus is actually cheaper, though a bit heavier as it is a steel frame seat rather than a composite shell.


On this occasion, I went to MSAR and saw Malcom Sanders http://www.msar-safety.com/default.asp. To my relief, my arse felt nicely supported within the seat this time! Whilst there, I took the opportunity to look at harnesses as well and settled on a set of excellent Schroth 6 point belts in red.

Having picked the seat, my thoughts then turned to the aesthetics...
The colour was easy, Red to match the rest of the interior. I also quickly decided that vinyl would be a better look than fabric (and Marc Pigeon at COBRA recommended a great leather grain vinyl). What was worrying me though was having a Corvette with a huge COBRA written on the seats. So after a bit of a chat, it was decided to have a custom embroidered seat with the words "Corvette by COBRA" on the headrest. It then turned out to be incredibly hard to find the script for the Corvette lettering. In the end, a lot of searching on the Internet found a font that was close and then I had to modify in Paint to make a near perfect match.


So the order was placed (and COBRA offered to do the embroidery for free!) Now all I have to do is sit back (sorry for the pun) and wait for them to be made and delivered!


Wednesday 2 March 2011

The Great Unpacking

So with the Corvette and all the boxes back at the Mill, it was time to see just what I had bought in a bit more detail.


Just playing around with my cameras Panorama mode! 


And I have to say that the car was in excellent condition. There was no signs of any body damage and not even any significant  gel coat cracks or crazing. The only slight downside was that there was a crack in the windscreen. From past experience I know that replacing it means dismantling the whole screen surround.

Next it was time to move on to the parts and now it felt like a second Christmas, boxes and boxes of parts to open and check out.


One of the down sides of not having stripped down the car myself is that I can't be 100% certain that I actually have every part and bracket I'll need to rebuild the car. But at least having previously rebuilt my 1960 Corvette, I can recognise most of the parts so I'll know where they're going to go and which are not actually going to be needed to build my race car (more on that later).

From that past experience, I know that what I want to do as soon as possible is to unbolt the body from the chassis frame so that the body can go off to be painted whilst I restore and prepare the running gear. It is so much easier to do the chassis work including fitting the engine and gearbox without the body and then dropping it back on towards the end of the job.

However, before the body can be removed the roll cage needs to be custom made as this bolts through the body to the frame and needs to be a close fit to the hardtop. Amazingly for an American car (which everyone assumes to be huge), being 6' 1" tall I really struggled to fit into my original 1960 car and this one will I'm sure be exactly the same. So my next step is to find myself the thinnest lowest FIA approved seats I can in place of the original seats which have my knees up against the underside of steering wheel and my head hard against the headlining even without my helmet on.

Monday 7 February 2011

Arrivals!

So after the trauma of finding the right shipping agent to get the car and all the parts collected up into the container I then just had to wait and worry about it travelling over to the UK and wondering just what it would look like when it arrived.

I needn't have worried as when it arrived it was all in one piece (actually all in about a thousand pieces) but not damaged and boy did I have a lot of cardboard boxes to open!

Stan came along with me as we needed two vans plus the trailer to manage all the parts, the engine and the car (which itself was full of parts in still more boxes!).

The car and parts had already been taken out of the container by the time we got to the Shippers depot in Liverpool so all we had to do was load up. Thanks to the guys from the yard who pushed the car onto the trailer as the electric winch decided to break down.

My mistake though was to load the car on nose first as the tail overhangs more than the nose and when the ramps went up they rested against the body and by the time we got to Saddleworth, the checker plate had worn a couple of notches into the fiberglass... Oh well, a bit of filler and sanding should see that right.