Thursday, 7 November 2013

Frame Restoration


With the body removed I could now get my first clear look at the Chassis Frame on the Corvette. Without the body it was now easy to lift the frame up to a nice working height on axle stands and give it the attention it needed.

One of the things that had me choose to build this car was my original experience of restoring a 1958 Vette when I realised that between Corvettes having a glass fibre body and a chassis frame made from girder thickness steel, the need for rust repairs and welding was eliminated. However, once the body was off this car, I was surprised to see a couple of areas of frame had rusted through. Still, I suppose that for a 50 year old car it isn’t so bad. They were in the bottom of the frame rails around the leaf spring front mounting point on the RHS.


As part of the roll cage fabrication, a couple of plates had already been welded on to cover / reinforce this area but there remained more to do.
After an abortive attempt to get my 160A ‘Hobby’ MIG welder to generate enough penetration, I gave a call to a local mobile welder who came out one Saturday morning and did all of the welding on the frame (including a little bit of seam welding to strengthen things here and there) in a morning. It would have only taken about an hour if the two of us hadn’t found far too much common ground to talk about with American cars and V8 engines; he is apparently a big Camaro fan!
With the welding done, it was time to clean up the frame. Mindful of cost and wanting to have everything under my own control I loaded up an Ebay purchased twisted knot wire brush into my angle grinder and set to it. I ended up wearing one of these out completely before the job was done but the £2:99 seemed a small price to pay compared to the cost of having the whole frame shot blasted and avoided all the trouble of getting it to and from the blaster’s.
To the bare metal I first applied a coat of FE 1-2-3 rust prevention primer from www.rust.co.uk .


Actually, it wasn’t me, but my lovely wife who, in the week after we got back from our Dominican Republic honeymoon, brushed on first the primer and then the Satin Black Chassis Paint J Thanks Baby!


The finished article, repaired, clean and painted ready for new and restored parts to start to go back on. At last the “reassembly” part of the project can begin!


Wednesday, 6 November 2013

Body: Part 1


Time to get back to this blog after falling in love, getting married, new jobs and other wonderful things that have kept me away (somewhat) from cars!

I’ve taken the Corvette down to the body shop and they managed to lift off the body so that they can work on that whilst I concentrate on the mechanicals.


Without a body on it, I had hoped that the frame would seem small and easy to manage and work around in the workshop but to be honest space has still been an issue as you can see from this picture of the unloaded chassis back at base.


That however has been improved recently with a couple of the long term (immobile) residents of the workshop having departed :-) !

My friend Karl the carpenter / joiner made up a ‘Dolly’ for the body to sit on from plans I got in a booklet on Corvette restoration. However, it turned out to not provide enough support of the overhanging rear section of body work so the body shop have had to put on a ratchet strap to stop the arse from sagging!
Note, the bike frame is not intended to remain as a feature of the finished vehicle in case of mechanical failure or running out of juice!

As you can see, the preparation and priming of the body has gone well but with the slightly floppy nature of the separated body, the painter is worried about cracking the top coat when lifting the body back onto the frame so the plan now is to get the frame refurbished (with powertrain fitted) back to him so that the final spray job will be done on an assembled vehicle.


This re-assembly should happen in time to allow Nigel to spray the car during the quiet shut down period over Christmas and New Year so I am looking forward to the prospect of a very shiny New Year’s gift!

Wednesday, 29 February 2012

Screen off

One annoying fault on the Corvette when it arrived was a 4" crack in the windscreen.
The only way to change the screen on a Vette is to unbolt the entire frame from the car and take it apart from around the glass.
So that is what I did. Good news was that this gave me a chance to send the big cast and chrome screen pillars away for rechrome as they were very pitted.
Bad news is that I will need all new rubbers and seals to refit my new glass and also the pillar tabs broke during strip down (they always do). :-(


One advantage at least, is that now it will be easier to spray the car as there is almost nothing to mask off. Then when it comes back it should also be easier to fit the new dashboard pad (cover). That is one job I'm more than a little worried about; glueing it down in the right place and without any bubbles... 

Tuesday, 28 February 2012

Bonnet / Hood, whatever

For this posting I'm bringing together a couple of jobs on the bonnet / hood of the car.

The tasks at hand were to arrange for the bonnet retention required by the regulations and also to fabricate the bug screen / deflector as seen on the original car.


First off, I tackled the deflector. I started with a piece of aluminium right angle and offered it up. The immediate problem was that the bonnet has a significant crown to it and so a flat piece of aluminium isn't going to work. Here, a little bit of the old hand craft magic came into play. What I needed to do was convince the stiff right angle section to take on a curve. This I did by careful hammering on the verticle flange of the  piece. As this was squashed by the hammer blows (onto an anvil that was in a corner of the workshop) it effectively became longer than the horizontal leg of the section. The only way to reconcile this was for the section to bow so that the vertical flange could grow. It sounds easy on paper and for the most part actually was, it just then took a while with file, emery and wire brush to remove traces of the hammer marks from the soft aluminium.
Once I had the curve about right I realised that the upstand was looking a bit big so I got the jig-saw out and free hand cut it down to size. The edge was a little wavy so another bit of time was spent with the hand file to dress down the flange to a reasonably even edge.


All that was left was to pop a few holes through the aluminium and then through the bonnet and we were there, except that I decided that to protect the paint and take up and slight gaps I would stick on a layer of foam as well.


I will make up the plexiglass deflector itself later as the priority is to drill all the holes etc in the body so that it can be sent away for painting and will not risk being scratched when it comes back.

Next to the catches...

I would love to fit a set of bonnet catches like those seen on the original car but these beauties were I believe custom cast in the 50s and 60s in Italy and mainly used on Ferrari race cars.


Right now, unless you have the real things or are will to spend $443 + tax and shipping for replicas ( http://reoriginals.com/hoodlatchkitvintagestylewithringthatyoulift-b0244.aspx ) you are going to have to go with something else....

Having used a set of these simple (and I think elegant) pins to hold the boot (trunk) down I decided to go for the same at the front.


I found these rather nice brackets with nuts at work so I decided to use a pair for this job.


One problem was that the threads were not correct for the bonnet pins but fortunately I had the correct pilot drill and tap so it was a straight forward job to open them up to the right size.


To try and get the pins in straight and even, I made marks on each side of the bonnet opening and strung across with masking tape.


Then I removed the pins and placed the bonnet in place and put the tap back and marked up to drill through the clearance hole.


And here is the result!


The slight difference will come that while the boot can keep its catch assembly as it is easy for a marshal to press the button once they have undone the pins, at the front the original latches have to be removed as it isn't acceptable to have to reach into the car to pull a handle to pop the hood to get at a burning engine. Without those original catches, there is no spring to pop the bonnet up so I will have to find some springs to go around the shaft of the pins to pop up the bonnet enough to get fingers under to lift it up, but otherwise this is another job done!!

Cool Brakes

Or more accurately, brake cooling.
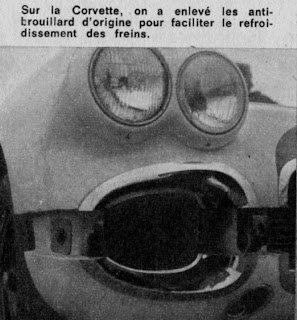
Having experience of what historic racing can do to Drum brakes I'm taking every opportunity to try and improve them.

First on the list is to add cooling ducts into the front panel from which cold air can be directed into the drums. Something that was noted in the French reports about the Corvette in 1962.


The large hole in the body was first scribed with dividers and then I chain drilled aound it before punching the middle out; very satisfying in a slightly Bruce Lee way!


The only trouble is that the back of the duct fouls the bumper bracket so this will need to be notched a little.


The rough edges on top and bottom of the duct will disappear behind the chrome 'mouth' that goes around this body opening.

More soon :-)

Tuesday, 1 November 2011

More mockups

Time to get busy with more of the myriad of jobs to do.
Next up was the location of the fire extinguisher and electrical kill switch. In both cases, I much prefer electronic solutions. I just think that building an expensive car and then fitting cheap choke cables to operate equally cheap master switches or extinguishers is wrong. Electronic master switch and extinguishers may be a bit more expensive but the result is a much neater installation.
Anyway, a couple of plain holes are the only bits I'll need to do at this stage ahead of paint.


Another couple of holes are needed in the trunk lid for the locking / bonnet pins. Then there were a couple of brackets to make to hold the pins themselves.


Moving on and with a head of steam from those easier jobs I got stuck in to making brackets to hold the rear tonneau / deck lid together where it had been  cut in half to fit around the roll cage.


The idea was to make up some nut plates to go inside the box sections and then hold it all together with aluminium U sections underneath. This was a job my Dad had done on the '60 Corvette so I was working a little in the dark. I had thought about using Riv-nuts but they are not flush to the surface. I seemed to recall something called a clinch nut which Dad had used. A search on the net and an order from eBay had a packet in my hands. To use these, you have to drill an 8.6mm hole and then press them in place with the vice. It turned out to be ever so easy to use and the nut plates were done in no time.

http://www.npfasteners.com/ns.shtml


A few more holes drilled in the U-section and the fiberglass and it all came together.


Wednesday, 5 October 2011

Mockups and c0#! ups...

So, the time has come to tell you what has been going on with the Vette and especially the roll cage.

As you will know from my earlier posts, my concern all along has been space in the cockpit. To that end I selected the smallest seat I could fit into and then locating it as far back as possible for maximum leg room.

So you can perhaps imagine my distress when the day after I got the car back (a big day of trailers and borrowed vans) I discover that the seat will nolonger fit into the mountings I had drilled but instead was held around 2 inches further forward by the main cage hoop.
Despite asking the cage guy to let me know if he had any trouble, he had decided that the best and only way to run the cage was to compromise the seat location.


Looking at what he had done, I'm sure it made for the best cage but he should have talked it through as a compromise might have got me a good cage and most if not all of the leg room I need. As it is, I'm now left with my knees tight under the wheel when I shift to the brake or clutch...


So some difficult conversations between myself and the cage man followed. He didn't like the idea of having to remake almost all the cage so in the end we compromised. He has bought me a leather replica steering wheel that's 2 inches smaller than standard and I'll have to live with whatever legroom I'm left with. I may end up having to bend or modify pedals too but I'll not know until it is all back together.

With that drama behind me it is time to get on with mock-up. I hate to drill holes and make modifications to a freshly painted body. As far as I'm concerned, you should only be bolting things together once the car has been painted. So I've now got to make all the body modifications and trial fit hardware etc  before the body comes off to go to be painted.
First job I have tackled was to fit the extra lights that illuminate the racing numbers. Easy to fit and shiny they boosted my moral after the stress about the cage. So I went to my photographs to decide what and where to put these. As with most cars of the period I think they used Lucas lights and I could get replicas online very easily. The amazing thing I found doing this was that the restored original car was missing the rear number light and that the rear number had been put on in the wrong place! Considering it sold at auction for almost half a million dollars you would have thought they would get that sort of thing right?

The original car on the grid at Le Mans with number light

The restored car without number light!

So out with the DeWalt drill and away we went with holes for mounting studs and screws as well as wiring grommets. Not a big job but they made me feel like we were back on track making forward progress rather than taking two steps back for every one forward.


Light should line up with Number on Boot Trunk!

and this should light the number on the door

More mockup and less of the other thing next time :-)